Double Giveaway!!

Black Pillowcase Pet Bed

I am super excited today to be uniting two of my very favorite websites – Sew Mama Sew and Blog Paws – via this very special giveaway of two of my pet products!   The giveaway is hosted twice a year by Sew Mama Sew, and the Wordless Wednesday is hosted each week by Blog Paws.  Please be sure to follow the links in the sidebar to see both of these wonderful sites.  There are so many wonderful giveaways on the Sew Mama Sew site this week, both for sewing/crafting supplies, and for handmade products.  And with Christmas just around the corner the timing for this huge giveaway could not be better!

Winners for this Sew Mama Sew giveaway have been notified.  There were so many great entries and I very much enjoyed reading each and every one.  As there were so many entries I decided to give away a second dog toy.  Winners for each prize are named under the prize.  Thanks everyone for participating and have a wonderful Christmas!

Black Pillowcase Pet Bed  Listing 0015-3-DSC00981 Listing 0015-4-DSC00979

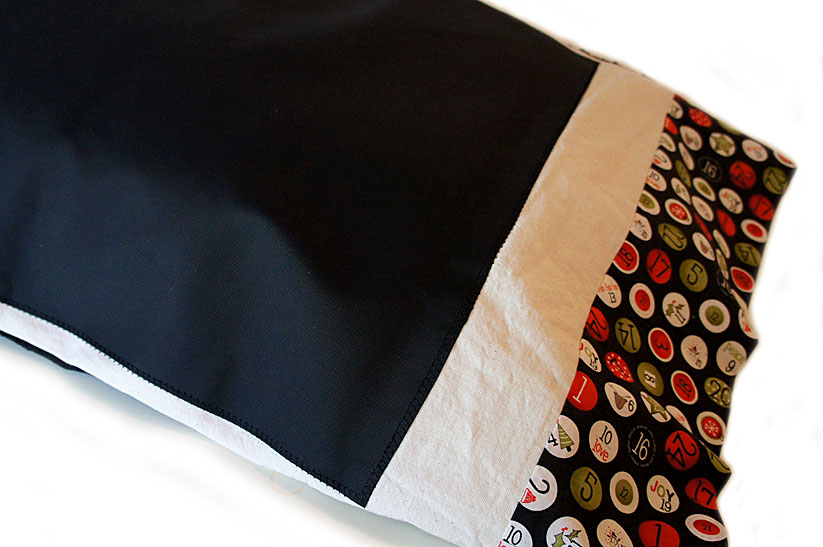
My first giveaway is this lovely Christmas themed pillowcase pet bed cover.  This pet bed cover fits any standard to standard/queen sized pillow, and makes a very special resting spot for your pet!  It is durable, easy to clean, and folds flat for travel or storage.  Black minky fabric with billiard-style Christmas design on the cuff brings a bit of whimsy to your pet bed for Christmas.  It has a french seamed cuff and large section of Toughtek slip-proof waterproof fabric on the underside to make the pet bed really stay in place.  Just purchase a pillow (or use one of your pillows or other stuffing) to make this bed complete!

Winner of the first giveaway:  Lisa Cox

Final-Dog-Toy-copy Final-Dog-Toy-2 Final-Dog-Toy-3-DSC05667-co

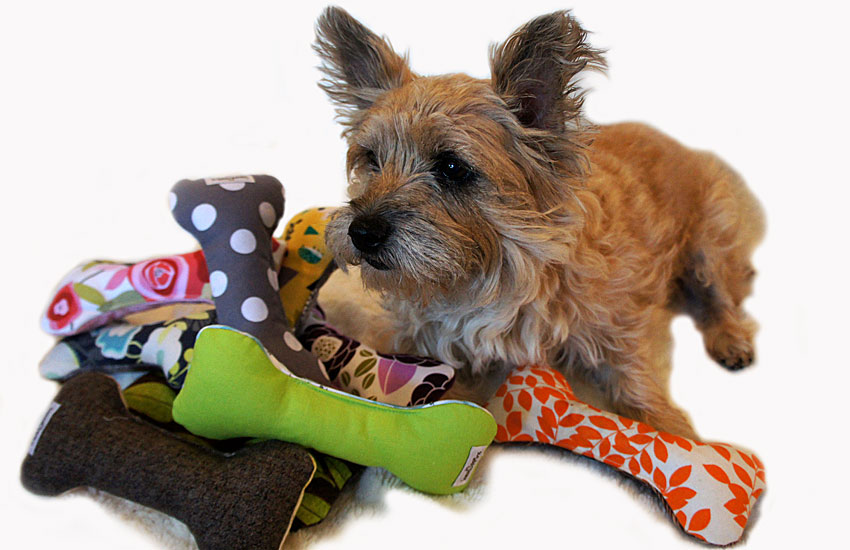
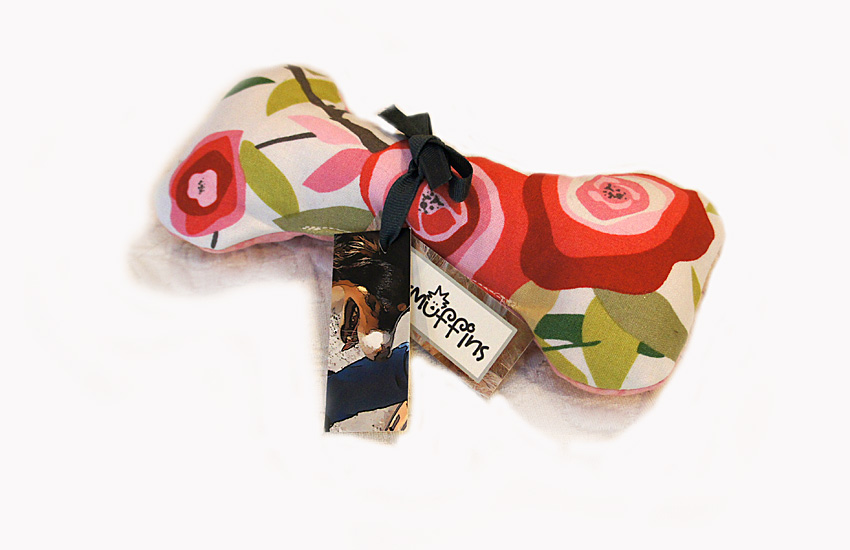
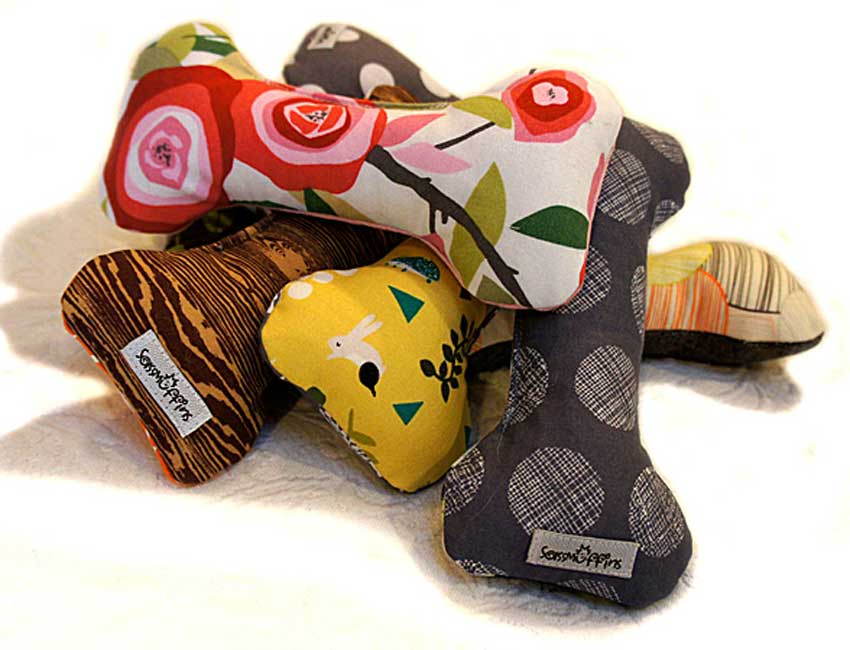
My second giveaway is your choice of any one of the cute “Mod Stick” dog toys you see in this photo!  Custom made from a variety of fabrics, this irresistible squeaky toy is made from a double layer of canvas covered in quilt cotton, and measures 8″ long by 3.5″ wide.  It’s easily cleaned (as is the pet pillowcase) by just popping into the washer and dryer.  Clean on cold wash and low dry.

Winner of the second giveaway:  Debra Neiman and Tenacious Terrier (giving away two dog toys!)

Entering this giveaway is very simple!  Just leave me a comment below, and let me know your pet’s breed/type and name, and whether or not you have any special things you do with your pet at Christmas (cute outfits, take them to grandma’s house, etc.).  I can’t wait to read all your responses!

This giveaway is open until December 13 at 5 p.m. PST, and is open to all US participants only.  Winner will be randomly selected and announced in this post on Sunday, December 15th, so be sure to check back then.  Also please go and visit the Sew Mama Sew website to see all the other fabulous giveaways!!

And if you prefer to make your own things stay in touch, because this spring I plan on making pdf patterns for all my wonderful pet products, as well as other goodies for your home!

This post is part of a Wednesday blog hop. Please click the “Blog Paws” button in the sidebar to follow all the other wonderful pet blogs. Happy Blogging!

Scarecrow & Gracie

Final-Gracie-&-Scarecrow

The Wizard of Oz??

Taken when Gracie was very young.  I think she thought this scarecrow…straight from the Wizard of Oz…was the real thing!  I did the life-size face transfer using products from Michaels, applying the ‘face’ to some muslin fabric.  I then sewed a back fabric section to the finished face and fitted all around a styrofoam head, pinning in place as needed.  I then made the costume, stuffed with straw and placed my finished scarecrow on the front porch.  My own Toto and scarecrow!!

Have a fun and safe Halloween everyone!

On The Bias

Final-Seam-Binding-5-
Finished Bias Binding

I’m not sure what sewing rock I’ve been living under, but I spent some time this weekend  relearning how to create buttonholes (with an attachment), and learning how to make my own bias binding from my fabrics.  As to the buttonholes, I learned the “old school” way how to make them using the zig-zag stitch on my machine many years ago, and am able to do this very well.  I have to admit, though, that using the special buttonhole foot for my Baby Lock machine makes it a fairly simple task!  We’ll call that discovery Number 1.

Final-Bias-Binding-1-

1/2 Yard fabric squared, 1/4″ seam stitched on three open sides, and first diagonal cut made in top layer of fabric.

Discovery Number 2, however, really is just a sewing wonder.  I’ve now learned how to *somewhat* easily make bias binding.  I say somewhat because it involves a few steps, but after my second try I had it figured out, and I have to tell you it’s like magic!  I still don’t quite see how it works; all I know is that it does.  If you are a quilter you may already know how to do this, but in case you don’t let me refer you to the website of Pat Bravo.  She has a simply fantastic tutorial there that will guide you through the steps to make your own bias binding out of any fabric.  No more limits to the few colors of bias binding that they stock in your local fabric store.

Final-Bias-Binding-5-

Seams pressed and cutting lines being drawn.

Final-Seam-Binding-3-

Rotary and scissor cuts being made.

That knowledge, along with my Simplicity Bias Tape Maker that folds/presses the bias tape for you, gave me exactly what I needed.    Once complete, my original 1/2 yard of fabric yielded a little over 9 yards of bias tape. I also see from searching online that there may be a special foot for my machine that will fold and sew the bias binding to my project, so I may still check into that via the shop where I purchased my machines.

Final-Bias-Binding-4-
Simplicity Bias Tape Maker at work.

Also, in looking further at Pat’s website, I see that she designs fabrics and creates her own patterns, both of which are sold at my favorite online store for quilt cottons, hawthornethreads.  So yeah, you bet, I ordered some of her luscious purple and aqua fabrics.  They have the modern, clean, crisp designs I love so much.

So why, you ask, did I need to learn how to make buttonholes and create my own bias binding?  I’ll reveal the reason tomorrow!  Do you have a favorite way to create bias binding?

Sewing Space

Final-Shop-DSC02951

Sewing Studio

As today is the last day of September and National Sewing Month, I thought I would share a few other ways I have my sewing studio set up for ease of use.  Please see my post from last Monday to see my favorite methods of fabric storage.

There’s one thing you can’t ignore with sewing, and that is how you set your space up for cutting fabric.  One of the main reasons I like to sew smaller items is that it makes setting up the space for this task much easier.  I only use a 2′ x 3′ cutting mat, along with my 2′ Omnigrid ruler, 6 1/2″ Omnigrip square, and rotary cutters for all these chores.  The real trick here is to get your cutting board at the right height for you, so that you don’t develop unnecessary back problems!

Final-Cutting-Table-2-DSC05

Cutting Table

Along with my cutting space I also wanted an organized area to store all my patterns I have developed.  I knew that narrow trays would be the perfect solution.  I found the right combination for cutting/storage at the Container Store, by combining two of their 16″ stackable Elfa drawers with six narrow trays and one medium tray. These trays pull out for easy access to my patterns, and in fact the top tray holds my rotary cutters and extra blades as well.  The deeper tray at the bottom holds my Toughtek fabric, which is quite heavy, and the freezer paper I use for all my pattern making.  Labels on the fronts of drawers make contents quickly known.

Final-Cutting-Table-2

Layers of Cutting Table Top

I added the Container Store’s “stick on” silver melamine to the top of the unit, and attached four casters to the base.  I have never needed to use the locks on the casters (stays steady enough for cutting without the need to do that), but  this addition makes the entire unit easily movable for times when you might need the space for other things.  Since the melamine top is approximately 21″ square, it is not quite the right size to support the 3′ x 2′ cutting mat.  Another solution – I purchased a lightweight 1″ thick drawing board, which just happens to be exactly 3′ x 2′, from my local Michael’s store to give my cutting mat the support it needs.  Perfect!  And again if space is needed you can easily take the cutting mat/board combo off the top and store away as needed.

Thread-2-DSC02936

Sewing Table Drawer

The other thing that helps me the most with my sewing tasks is my large sewing table.  I have to admit I splurged here and purchased a dining table for my main work area.  This table is big…long enough to hold three sewing machines side by side.  And yes sometimes I have them all set up at once, and can quickly roll my work chair from one to the other.  I have my regular machine and my serger, and a second regular machine that has black thread and a walking foot for sewing the Toughtek bases to my pet beds.  And the best thing about my table is the built-in narrow drawer, which stores all my thread, scissors, and other sewing instruments.  Keeps all that away from the kitties and neatly stored.  All in all, a perfect sewing room guaranteed to keep me happy!!

Do you sew, and if so do you have a favorite way to set up your sewing space?


Fabric Storage

Ikea-Bookshelves-DSC05244

In honor of September’s National Sewing Month, I thought I would share my favorite methods of fabric storage.

To store my lovely fabric stash of quilt cottons, I recently purchased some white glass front shelves from Ikea. The glass doors help protect the fabric from dust and my kitties. But the best part is that you can easily see just what you need, without digging through a stack of fabric. And to be honest, I just love looking at them all neatly folded and color sorted. It’s like a nicely organized bookshelf, except there is fabric instead of books!

Canvas-Bins-DSC05246-copy

I have all of my scrap or small yardage quilt cottons, that I typically use for my quilt block beds, stored in small canvas bins on Elfa shelving from the Container Store. These little canvas bins are available in different sizes, and are nicely accommodated on different shelf depths. They also come with a clear plastic label area. Again I have them color sorted, but rather than type out what colors are in what bins, I just used the fabrics themselves for the label fronts, so that I know which bin to grab on my next project.

Final-Canvas-Tubs-DSC05256

For bulky fabrics, like my minky fabrics, I have found that nothing works better than these large canvas pop-up laundry bags I found at the Container Store. They are wide enough, and deep enough, to hold quite a few yards of the fabric. Since I stock 37 colors, I purchased several bags for color sorting.  And, in my case, the bags fit beautifully underneath my large sewing table. An extra bonus!!

My utility fabrics (canvas/muslin/batting) are stored in large clear plastic tubs with lids that I got at my local Target store. I do have some unwashed bolts in the room, but like to transfer the fabric to these tubs once washed. Choosing clear containers lets me quickly keep track of my inventory of fabrics washed and ready for cutting.

Thanks to Lucy for assisting with the photography.

How do you store your fabrics? I would love to know!