Snappy H’appy Photo Challenge-Week 3-Watercolor

snappyhappy-galactic

So the challenge this week is to use a photo and edit it via an app to look like a watercolor.  This Snappy H’appy Challenge is hosted by We Live in A Flat and Firebonnet.  Be sure to check out the other challenge photos via their sites.

But before I get into this photo challenge, I just want to challenge everyone else out there  – if you think you can’t take good photos, the truth is YOU CAN!!  If you have a smart phone, and especially one of the more recent ones, you have everything you need to take some great photos!  No fancy camera and lenses are needed.  Just grab your smart phone, find the camera icon, and start snapping.  Just keep these few general rules in mind:

1.  DO NOT turn on the flash.  If your phone camera has the setting on “Auto”, turn the flash OFF.

2.  Place yourself between your light source and your subject (i.e. between window and subject or with the sun behind you).  This will help you to get good lighting on your subject.

3.  Try not to move while taking pictures.  Use a tripod if you want.  I have never done that with my phone, but rather just try to keep the phone steady while taking the photo.  And you might find that your photos that have some “movement” or “blur” are interesting.  Don’t discard them too quickly.

4.  Yes composition is always important.  Check out this article from Digital Camera World for 10 great basic composition tips.  Then let the photo editing apps on your phone do some of the hard work for you!

Snapseed-Screen-3

Snapseed App

Once your photo is taken it is automatically saved to your camera roll.   Now comes the really FUN part!   If you are brand new to photo editing on your smart phone or tablet, you will want to get some different photo editing apps.  Go to the app store on your device and do a quick search called “photo edit”.  Plenty of choices should pop up.  Always read the details and reviews on an app before installing, even if they are free, to make sure that is what you want.  If you download an app and find you don’t like it, you can always delete it later.

If you only want to load one app to start, I would highly suggest installing Snapseed.  It is typically my first “go-to” app for photo edits, and is easy to learn.  It will do most things you will need, and then some.  There are many filters in this amazing little program that will give your photo almost any look you want.  Once the app is installed, open it and select a photo from your camera roll to work on.  And don’t worry, your original is safe.  Questions?  Click on the question mark and select “show overlay” if you forget how to do something.  Once edits are made you will have choices to save this newly edited version to your camera roll, or to share it via Facebook, Twitter, etc.

Once you have learned one photo editing app, it’s time to explore!  After awhile you will learn that it is even more fun to edit in one app, save, then edit in another app, save…and so on, until you get just the look you are after.  It’s kind of like using layers in Photoshop, only much easier. And it only takes a few minutes!  And that’s what this 12 week photo challenge is all about.  We are introducing ourselves to new ways to edit photos via apps, so join us weekly on our learning adventure.


Original-Lucy-Iroing-Board

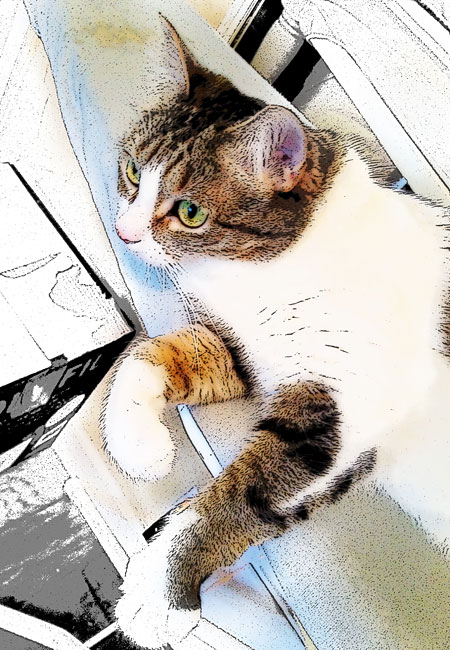
Original App Challenge Image
Iron This!

Mobile Device: iPhone 4s
App Used:  Snapseed, Mobile Monet, Camera Toon

So, here is my original photo for this week’s challenge.  I have to say the composition on this one is not good at all.  Lots of distracting elements in this photo.  But – I will show you some really cool apps that will help with that, and give the photo a nice watercolor effect.


Snapseed-Edit

Snapseed App Edits

First app up is…you guessed it…Snapseed for quick edits to brighten, add contrast, warmth, and sharpness to photo, and to crop.  Changes are subtle, but if you compare closely they are there.  Save and move on to –

Final-Monet-2

Mobile Monet App Edits

I just found Mobile Monet while researching apps to give a watercolor effect to photos, and boy do I love this one!  When you first open it converts your photo to black and white, and then using your finger you “brush” the color back in wherever you like.  Here is a nice YouTube video to see how it works on an iPad.  You can adjust the line drawing prior to adding color.  Quick and easy!  So now I have a mixed media drawing/watercolor.  Background distractions are significantly reduced and focus is now on my main subject, my kitty Lucy.

Final-Toon-2

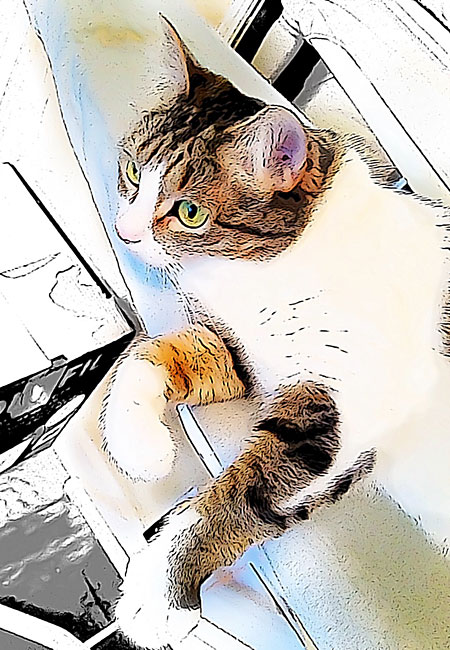
Toon Camera App Edits
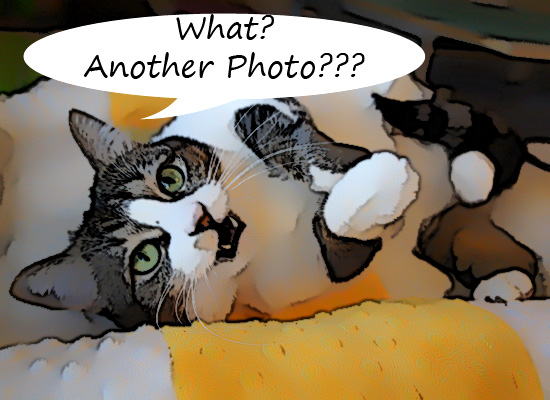
Final App Challenge Image

For my final edits I open the saved photo in Toon Camera and and use a toon filter to soften the watercolor effect just a little more.  Again these changes are subtle, but you will notice less “dots” in this picture and wavier lines in the color parts of the photo (Lucy’s fur).  Done!

Want to have fun and participate in the photo challenge, or just visit the other entries?  Just click on the Snappy H’appy Logo at the top of this post!


A Picture is Worth

Master-Luy-Floral-Header

A Thousand Words.

You know the saying.  But I say – A picture is worth a few minutes of editing!  Seeing is believing.  Check out the photos here for before and after editing results.  I know which ones I prefer.  Do you work with Photoshop or Photoshop Elements?  See my post from Monday (or click on link in the sidebar), to see my video tutorial on how you can get the same results with your pet photos!  Don’t want the white background – just skip that one step.

Happy editing!

Edits-1

Edits-2

Edits-3

This post is part of a Wednesday blog hop. Please click the “Blog Paws” button in the sidebar to follow all the other wonderful pet blogs. Happy Blogging!

Photography for Etsy

Photoshop-Tut-Header

I have been asked before about how I take photos for my Etsy product listings, so I thought I would take you through my process step-by-step.  One of the things that makes Etsy such a great community is the willingness of sellers there to help each other out!  Hopefully you will find some useful information within this post/video, even if you are not on Etsy.  Also be sure to do a search in the Etsy Seller Handbook for some super photography tips, and if you are into photography via your smart phone, my friend at “We Live in a Flat” has some fantastic phone app tutorials!

To start, I use my Sony Nex C-3 digital camera, along with Photoshop (older vs CS2) for my product listing photos.  Although I definitely love my iPhone with it’s apps, I find I get the best detail work from my Sony camera.  One of the best things I did after getting my digital camera/Photoshop was buy a couple of good photography books.  My favorite is “Photoshop CS4 Workflow” by Tim Grey.  Although it was for a newer version of Photoshop, it taught me the basics about keeping my photos organized and saved for later use.  After reading this book a couple of times, I developed a quick “cheat sheet” for editing/saving my photos.  Although I no longer need that list, it was indispensable when I first set up my Etsy shop!

Here are the steps I use when creating my Etsy product listings, with a video of the full process.  With photographing pets I will say that I always take photos with good daylight (windows at my back) and never, ever use flash.  I take most photos on my bedspread because it is an off-white matelasse fabric which gives a nice white background to start.  Taking photos when pets are most cooperative (i.e. not too close to dinner time) is also a good idea!  And be sure to take LOTS of photos; you can always discard the ones you don’t want to keep.

1.  Make a copy of chosen original photo and move to my desktop (this way my true original is always intact).

2. Open File>Save As, and rename photo “Master [Photo Name].”, then save to Photoshop (psd) format.  Notice that photo is renamed in top left-hand corner.

3.  Go to Layer>New Adjustment Layer>Levels.  Click ok to leave layer settings as is.  Using the little triangles on the graph adjust by dragging triangles to “match” graph, and click ok.  In this case I needed to pull the small right-hand triangle in toward center of the graph, which made the photo much lighter.  This small step will do WONDERS for most photographs, which are usually too dark.

4.  Go to Layer>New Adjustment Layer>Brightness/Contrast, click ok for layer settings, and adjust to your liking.  I usually increase the contrast and brighten the photo slightly more.  Just be sure the photo doesn’t get washed out.

5.  Repeat Go to Layer>New Adjustment Layer with Hue/Saturation and Color Balance to your liking.  Increasing the yellow slightly in the Color Balance section will warm up your photos if you think they are too “blue”.  In more recent versions of Photoshop I believe you can do all these adjustments via bar sliders on your screen, but this is how I have to do it with my older Photoshop version.

6.  Now within my Layers Panel I click the icon to ‘Create a New Layer’.  Rename this layer “Dodge”.  From the left hand Tool box select “Brush Tool”.  Leave the brush settings as is, with Normal mode and 100% Opacity.  From the color picker change the color to White.  You will use your computer keyboard bracket symbols to increase and decrease the size of the brush tool.  What you are going to do now is white out any unnecessary background in your photo, which will give a very polished, professional look to your listings.

7.  I complete a quick overview of the photo for any small corrections needed.  With the Background layer highlighted, select the clone stamp tool from the tools menu, then hit ‘Alt’ on your keyboard and click your mouse once in the area you want to copy the pixels from, then click once with the mouse to the area you want to paste pixels into.  Repeat as needed.

8.  Do a final save on your fully edited Photoshop master, then go to Image>Duplicate to duplicate the image.

9.  Crop the image to 850 px wide by 550 px tall (160 resolution) for Etsy (cropping as you choose), then go to Filter>Sharpen>Unsharp Mask and sharpen about 100%.  Leave “Preview” checked to see your changes.

10.  Save for Web, noting the image size in bottom left-hand corner of your screen (try to keep at 100 K or smaller).  Change name of file to “Final [Photo Name]”.  Image will be saved as a JPEG.  It is this cropped/sharpened image that will be used on your Etsy listing.  Your original Master photo will remain intact with Photoshop edits in case you want to crop to a different size/resolution later, for example if you want to produce your photo as a print.

Hope this helps and if you have questions, please ask in comments!

Sunshine Saturday

Final-Yellow-Weed

Well it’s been a productive Saturday here.  Couple of hours sewing, couple of hours gardening, visiting with neighbors, and making a fresh batch of chicken fajitas!  It’s a beautiful sunny day in central Texas, with temps in the high 60’s.  Hope you are having a wonderful day wherever you are!

Fina--Peyton-Resting

Peyton using Catnip Toy as Resting Pillow

Final-Pansy

Pansies in the Garden